Showing posts with label SCRAPBOOKING. Show all posts

Friday, 26 April 2013

PRINTING PHOTOS

 photo PrintingPhotos_zpsd07bb395.jpg
We've talked about the different methods of scrapbooking, so lets get into the other little but important aspects of it! Photos are a major part of scrapbooking, in fact, it is the reason that I wanted to start scrapbooking. 

With the digital age, many of the photos we take end up displayed on Facebook, or simply stored in folders in our computers and hard disks. I longingly remember spending hours with my sister flipping through physical albums of photos that my mum lovingly put together (along with memorabilia from the places we visited). I miss that; I want to be able to flip through photos and reminisce on a lazy afternoon, and no not on the computer.

But if you've considered scrapbooking then you've probably considered this issue: the cost of printing photos. Estimating the amount of photos you'll print for scrapbooking, it isn't going to be cheap! Or even convenient, for some people.

Here are the 3 ways I have turned to for photos:
  1. Printing at Home.
    My mum bought a Canon photo printer quite a few years back so initially this was my go-to printing solution. I think in the long run the cost will be justified by the convenience and cheaper cost of each photo. However, the colours don't always come out right. Sometimes the colours come out a bit too saturated. This is especially so for black and white photos, where the photos came out with a slightly yellow tint.
  2. Photo Printing Shops
    Most of the time I print my photos at Harvey Norman Photo centres. I like the colour and quality, especially being able to print in matte (I love matte photos) and that the B&W always comes out just right. Its 25cents a piece, cheaper than most instant photo printing places. My aunt signed up to be a member and for a period of time I was able to get discounts with her card; each piece only cost 17cents! So I felt that was pretty good. I like this option the most. Though it might not be the most convenient option as I don't have one near me. This means I have to wait quite sometime while gathering photos to be printed, so that I can print all of them in one shot, making the most out of one trip.
  3. Online Printing Services
    There are now services in Singapore that allow you to order your prints online and have them delivered straight to you! The one that I've tried out is Portagram, a relatively new printing service that prints out your Instagrams! You can read my review hereThis is of course the most convenient of all the options. I mean, come on, you don't even have to set up a printer, buy photo paper, or go to the store! But I have yet to try one that gives me affordable prints with tip top photo quality, so let me know if you know of such a service!

If I could, I would print out every photo and extras even, so share them around with my friends and family. :) Eunice


Wednesday, 10 April 2013

MINI ALBUMS

 photo minialbums_zpsd0b29c63.jpg
When you think about working on scrapbooking, and layouts etc... 

 photo D-ring_zps20b5e0d1.jpg
...does this stress you out? This is my D-ring album and a little research tells me that one D-ring album can hold 40 layouts (double-sided on 20 page protectors) and probably more to about 50-60 if your layouts are thin with little embellishment. Isn't that idea intimidating? That to fill a whole album you have to put in so much time and effort to create at least 40 12"x12" page layouts (even with the photo freedom system)? I know so many people have a few albums and its unimaginable for me right now. Filling an album is on my list of things to do before I turn 21, which is in a year. That's how impossible it seems to me. 

Well, if your intention to scrapbook is without the goal of filling out a full album, you can always turn to mini scrapbook albums! These are usually event oriented (like a trip, birthday party, graduation) or theme oriented (like school, job, baby's firsts or your relationship with someone), not a mish-mash of everything in your life. So it would definitely make good presents for friends or family!

Here are three really simple ways you can make a mini-album!

 photo minibookvera_zps5132fdac.jpg

This is an accordion style mini-album that I made as a birthday gift for a friend. I chose this because it has the perfect size for what we wanted: a half mini scrapbook album and half card. And its really simple! The one I made was made with one sheet of 12" by 12" cardstock, has only four sides and each side is 5". When I learnt this in a scrapbooking class they used a machine (that I do not have) to die-cut the shape out of cardstock for me, so I don't really have an actual tutorial. But here is a link to a video tutorial on how to make a smaller sized album (4" sides) that has more pages!

 photo minialbumme_zps5189d9a6.jpg

This is my first total DIY album. It's a simple 4"x6" album which has covers made out of hard board that I wrapped with cloth. I made this to document a relationship/journey and I'll tell you why its perfect for this:
  1. You can add in pages whenever you want. Just cut a 4"x6" page, use the regular two-hole puncher, and add it into the metal hinged clasp rings. So you don't have to worry having something new to add in like you would with a mini-album.
  2. Regular 4R photos fit perfectly in this.
But there are also cons:
  1. There will be holes in every page/4R photo
  2. It feels a little flimsy because the rings aren't connected, so the pages move around a little.
 photo minialbumgen_zps9d1dad8b.jpg
If you aren't into making the book or its pages on your own, then the easiest way is to just get a book to fill up! I did up this one as a farewell gift for a friend by getting one of the scrapaholic notebooks and filling it up with photo collages and little farewell notes from everyone. You would preferably want to get a book that has thicker pages so that it has better support. Also, try getting a wire-binded book instead of a tightly binded book because with the layering of your photos, embellishments and what nots, your book is going to end up thicker than it started out to be. A wire binded book gives a little more space to accommodate this change, and will still be able to close pretty well if it doesn't get extremely thick.

Although, there is one other thing to consider. Empty books and note books tend to come with many sheets of paper, like at least 15. That would mean 30 sides to fill! Do you have many photos to add or things to write? If you don't you could consider taking out the extra pages but that usually is quite a hassle.

Each method has its pros and cons but I think it really all comes down to why/who/what you are making this for. There are tons of other ways to make mini-albums out there so you can be sure to find one that suits your need! I would recommend exploring youtube. The are many dedicated scrapbookers who provide step-by-step video instructions on how to make each type and I definitely find it easier to learn from a video! 

I hope this helped you! Eunice

Part 1: Traditional Scrapbooking
Part 2: Photo Freedom
Part 3: Mini Albums


Monday, 8 April 2013

PHOTO FREEDOM

 photo PhotoFreedom_zps1bceb3d4.jpg
Yay! Let's begin with Part 2 of the series of scrapbooking posts! Last Wednesday I shared with you about my love-hate relationship with traditional scrapbook layouts (well, more hate than love). I ended it talking about a solution for my scrapbooking problems, so here I shall introduce to you the divided scrapbooking system! 
 photo photosleeves_zps2902d300.jpg


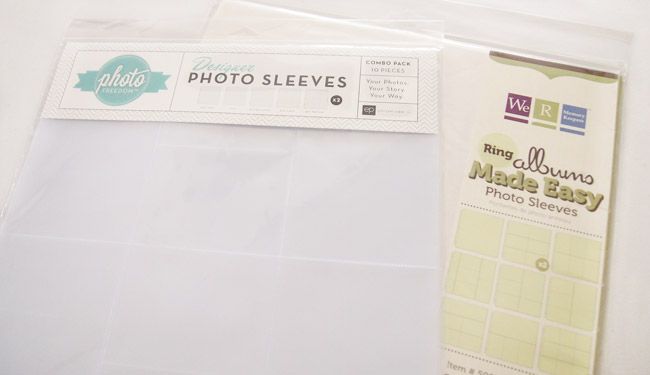
Scrapbooking companies now make page protectors with pockets for photos and journaling, making things so much easier. I use the ones by Photo Freedom Echo Park, and We R Memory KeepersThe idea of this is that you don't have to worry about how you're going to arrange your layout. You simply:
  1. Pick out the photos you want to use
  2. Choose a divided photo sleeve that fits
  3. Slide your photos into the given pockets 
  4. Add some titles/journaling if you want
  5. And you're done!
Sounds too good to be true? It isn't! I mean sure you could add embellishments and extra stuff to your photos, but it still takes the main worry of designing the layout off your mind! I would say that it 'uncomplicates' the whole scrapbooking process. These were some that I worked on in January.

 photo yogboth_zpsfedcf380.jpg
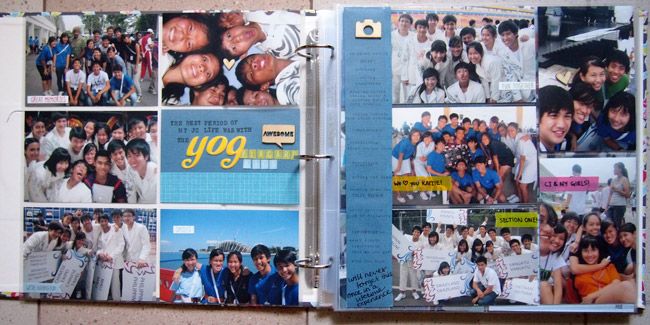
This was from back in 2010 when I was a volunteer for the opening and closing ceremony of the Youth Olympic Games in Singapore. A bunch of other schoolmates and I spent days hanging around together during the practices and although many of the friendships formed didn't quite stay strong after the whole experience ended, it was the best time of my JC life because there was not one moment when I worried about school. We made new friends, played games, ate and had fun all day. It was a once in a lifetime experience and I'm so lucky to have gotten the chance to be there with you guys. If any of you read this, even if we hardly talk now, thank you for the wonderful memories. :)

So naturally, I wanted to document it somehow. But I ran into a problem. We took tons (I'm serious) of photos during the whole period, and I printed many of them out back then because I loved how bright, colourful and fun every photo was. But I had too many photographs I wanted to use. How was I ever going to make a layout for this? I put this project off for the past two years, and when I got my hands on the divided photo sleeves, I immediately got to work. I loved how every page looks so vibrant because of the many people in each of the photos, and how it captures all the fun we had together.

 photo yog1_zps494f5178.jpg

 photo yog2_zps3a1fa5b8.jpg
This photo sleeve had a 2"x12" slot on the left, so I decided to make a journaling strip, using my typewriter to add a list of all the things I remembered most vividly about this period.

 photo yog3_zpsaf9afafb.jpg

This system is great for when you have a whole bunch photos you want to scrapbook for a particular event. I'm the kind of person that feels every photo is important and I'll probably break down if you only let me choose one. Or two. Haha So if you're like me, this is probably the scrapbooking system for you!

 photo photostash_zpsb235adc7.jpg

This is where I stash all my printed photos and what you're looking at is only part of what I started with before I used the photo freedom/divided scrapbooking system. Over that one weekend in January alone, I halved my stash of printed photos and did up about 8 pages. Just like that. It's really easy to do and I find that I'm motivated to do more than one layout each session, unlike when I work on 12x12s. The sense of accomplishment is wonderful! Although, like I mentioned in my previous post, that doesn't mean I want to give up on full 12x12 layouts completely. I think slotting in one every once in a while is key to giving my album some diversity.

I'll be working on putting my older photos into the protectors and make that stack of photos much smaller. But I'm also thinking of starting on a Project Life series, where I can journal about normal day to day events which I want to remember. I think that would be perfect for the little things. If you haven't heard of Project Life, you can check out a cute video here. I also started a Pinterest Board for Project Life inspiration and you'll see that I really love the simple no-frills ones! I would love to be able to have mine turn out as clean and simple as theirs. 

If you were thinking of scrapbooking and felt the same way I did in the past (overwhelmed), I hope this helped you see that it doesn't have to be too difficult if we choose not to make it so! Eunice

Part 1: Traditional Scrapbooking
Part 2: Photo Freedom


Wednesday, 3 April 2013

NOT A TRADITIONAL SCRAPBOOKER

 photo TraditionalSB_zps48376b8b.jpg
Hey there! If you didn't catch it in my previous post, this month I will be working on a series of posts that are all scrapbooking related! I've always been quite disappointed that none of my friends seem to be as interested in scrapbooking as I am. My boyfriend used to make fun of me, saying that the target age group for this hobby is probably older women who are stay-at-home moms. I don't agreeee! I think scrapbooking is a fantastic way to be creative and at the same time, keep your memories looking great! To start it off, it seemed only right to talk about traditional scrapbooking first!

There might be another definition of what traditional scrapbooking is, but to me it means doing full on 12" by 12" layouts. I'm sure you've seen these around, in online galleries or when you walk into scrapbooking shops. These are the layouts that probably come to mind when someone mentions scrapbooking. Well, I can tell you that I am not a fan of 12x12 layouts. Here are some of my reasons:

  1. It's intimidating. The blank canvas is too large.
  2. There are too many design elements and 'rules' to consider. Should I fill up the whole page? Would it look too cluttered? Should I leave some space? If so, how can I leave space but not make it look plain?...
  3. There is a pressure to keep coming up with new ways to arrange the items on your page, even if you found a layout style that you like.

But still, a 12x12 layout is at the heart of scrapbooking, so I do try to challenge myself with them sometimes. But of course I like to keep it simple so I try to push the thought of 'rules' aside when I do.

 photo layout02_zpsef9ed1b3.jpg  photo layout03_zps43735eb7.jpg  photo layout04_zpseb676aed.jpg  photo layout01_zps002ee60e.jpg

12x12s aren't for me, but you might enjoy them! I find it hard to be inspired to do a 12x12 layout, and I never seem to be able to complete more than one each scrapbooking session. Sometimes having a common theme for creating scrapbook layouts can really get the inspiration and motivation going. Mandi of Making Nice in the Midwest has a feature on her blog where she showcases a fantastic inspiration system for her scrapbooking called 'Outfit to Scrapbook'. She picks out details (patterns, colour swatches, design) from outfits that attract her and implements them on her scrapbook page! That seems like a really fun and effective way to get an rough idea before starting on a full 12x12 page!

Do 12x12 layouts intimidate you too? Well, don't worry! Someone out there in the scrapbooking industry thought of us and came up with a way for people like you and me to spend less time scrapping more photos and without much fuss! I'm totally in love with the new system which I will talk more about next. I'll be back with Part 2 next week! :) Eunice


Friday, 5 October 2012

DIY EXPLODING SCRAPBOOK BOX

Photobucket

So the other day I dug up an envelope, which was in a file, which was in a drawer so stuffed that I had trouble pulling the file out. In this envelope I found all the little notes my JC classmates wrote for me during graduation, and it bothered me. I needed to do something to make sure they didn't disappear into the corner of my drawer. So I decided to go with an exploding scrapbook box. Want to see how it explodes? ...

Photobucket

Yeahhhh not much impact there but you get the idea. Another person would be very much surprised when they first open it! Its a box that opens up into a 12" by 12" scrapbook page, and I stuck all the precious notes in it.

The idea is to take a 12" by 12" sheet of cardstock, and divide it into nine squares, each of which would be folded later on. From there you decide if you want to have joining squares (eg.top row, bottom-left two squares, two squares on the right), or just single squares (eg. center-left), and then to cut the slits accordingly. After which you can fold along the lines of each square.

To make the cover, measure a square with 4.2" sides. This gave it an extra 0.2" so that the cover would fit over the box nicely, although you could try it with 0.1" because 0.2" feels slightly loose on the box. Add about 1" all around whole square, so as to make the sides. Use the extra corners to stick the sides together, and you've got the cover done!

Now all you have to do is decorate it! You can do it like a scrapbook page, with pictures and all, but here are some examples of what you can do if you want to add in journaling on little notes! :) (I added stickers of words that described the friends that wrote those individual notes. ^^)


Photobucket

Photobucket

Photobucket

Photobucket

Photobucket

Photobucket

Photobucket

Now this box of precious notes is sitting on my shelf and every once in a while I only have to reach out for it and think of my friends while reading what they wrote. There's a number that remind me not to give up, who also told me to do my math, a few that are so sweet, one that makes me laugh a bit, one that seems so skeptical, many that make me smile and one that warms my heart and makes me tear up every time. But all make me feel a bit of heartache. Everyone's gone on to do their own thing now, and I do miss them so. I love you all no matter how split up our class was. <3
Eunice


Saturday, 4 August 2012

MAAD

Paid a visit to MAAD last night! If you haven't heard of it, its the Market of Artists and Designers, and its held on a Friday every month. Yesterday was the first time I paid it a vist, and I was impressed! 


Our local talent is abundant, and I'm glad theres an outlet for people to express themselves creatively! There were tons of booths selling unique items and crafts, and I'm all for handmade, so it was a feast for my eyes. I also took a class at Scrappin Love's booth: Keep Calm and Carry On Notebook and Tag. It was pretty fun! And my notebook turned out really pretty. ...Perhaps too pretty to use. Haha


I'm kinda looking forward to going back next month. ...We'll have to see! Eunice