Showing posts with label CRAFTS. Show all posts

Friday, 21 March 2014

OLAF SHRINK PLASTIC PIN

 photo P3190521_zps97f939f9.jpg
A few months back I did a hand lettered piece of Olaf and one of my favourite songs from the movie Frozen. This time, I thought it would be fun to take that piece and make it into a little pin using shrink plastic, and it turned out to be a great idea. 

 photo P3180467_zps31c2a179.jpg
To redraw Olaf onto shrink plastic, I photocopied the original hand lettered piece and reduced the size (you need to know how much your shrink plastic will shrink to estimate how small or large you need to draw it). However, I ran into a little problem of not being able to photocopy it with the image reversed, as my shrink plastic required since the rough side to draw on was the underside. Sure, I could scan it into my computer, flip it, then print it, but that seemed to much of a hassle. Instead, I recalled a trick that Moses mentioned just last week (fantastic timing, thank you Mo) about how to make an easy light box. Here's how:

 photo P3180475_zps2d3815ce.jpg
1. Turn on the torch light function of your phone, if your phone has one.

 photo P3180477_zps6aade9a2.jpg
2. Place your phone in a box file with the torch light side up.

 photo P3180485_zps30b524d2.jpg
3. Close the box. And there you have a makeshift light box that's good enough for small projects! I just placed my Olaf image face down on the flat surface of the box file, put the shrink plastic above it and could trace it easily.

 photo P3180483_zps7131668c.jpg
It really is that simple. A light box is such a novelty item as they are way out of my budget but with this neat trick, it sure is going to be enough for what I need it for. To trace Olaf, I used a Japanese Artline marker that is meant to be used for writing on photos. White pens and markers have always given me problems but this one worked surprisingly well.

 photo P3180492_zpsdf777ca2.jpg
Trim the excess plastic. I always find cutting shrink plastic frustrating because it isn't easy to cut corners even with a pair of small scissors. Usually, I will end up scratching the top plastic by accident. But I think I did quite alright this time. 

 photo P3180493_zps477c142c.jpg
Stick it in the toaster on a sheet of baking/parchment paper, and get ready for the most nerve-wrecking minute of your day as you watch Olaf shrink and curl up like crazy as if his arms are going to stick to his head and he'll never flatten out. But he will eventually. Well, most of the time. I'm usually pretty lucky.

 photo P3200546_zpsc1ba0487.jpg
After taking it out and letting it cool, put some super glue on a pin backing and stick it on the back of Olaf and it's done! It would be a good idea to seal the back with some waterproof sealer to protect your markers/inks/paints, but I didn't because I don't have any on hand. 

 photo P3190540_zpse949f72c.jpg
I love working with shrink plastic partly because of the endless possibilities, and partly because its pretty exciting to see your art become something hard and durable. If you want to work with shrink plastic and want to pick up some tips and tricks before all your hard work goes to waste in the toaster/oven, check out this forum where there is a comprehensive list of things you should look out for when working with shrink plastic! It's really useful and I always refer back when I want to work with shrink plastic.

Eunice


Thursday, 13 February 2014

DIY HEART STITCHED MAGAZINE ENVELOPES

 photo diyheartstitchmagazineenvelope_zps64d8f211.jpg
Are you giving out love letters for Valentine's Day tomorrow? If you are, here's a simple DIY you can use to give your letters that extra touch!

 photo P2110370_zps1fdc640f.jpg
Firstly, tear your desired pages out of an old magazine. This not only saves paper, magazine pages will also give your envelopes a unique look! ...Don't frown at me for tearing up a Discovery Channel Magazine, I haven't touched them for years! It's justified! Any page would do, you can even use one that is just full of words, that would work too!

 photo P2110418_zps8c536e56.jpg
I'm using a WRMK Envelope Punch Board to make my envelopes for this project, but if you don't own one, its really simple to make one just by tracing the shape of an envelope onto the magazine page and cutting it out, like in this project.

For me, I was looking to make a 3"x4" envelope, so I followed the measurements on the board and cut my magazine page down to a 6"x6" square.

 photo P2110374_zps092752f9.jpg  photo P2110380_zps741e404e.jpg
Score. Punch. Score. Punch. The envelope punch board makes it a breeze. 

 photo P2110382_zpsd894663d.jpg
It also comes with a corner rounder to round the corners of the envelope. Once thats done, you just need to stick the folds together to get a complete envelope. But for this project, stitch the heart first before you do so!

 photo P2110386_zps45c382f4.jpg
Here's the slightly tricky part. Before attempting to stitch the heart, use a pencil and ruler to mark out all the places you intend to poke a hole into. For a striped heart like the one above, your holes just need to form the outline of the heart, and aligned like a mirror image. For a heart cross stitch pattern, I googled heart cross stitch and took note of how many 'x's I needed, and marked out the holes with a gap of 0.5cm in width and height from each other. After that, I use a needle to poke all the holes in advance to make things easier when it comes to sewing.

For the thread, I pulled 2 strands from the regular 6 strand embroidery floss to use (thickness of 4 strands after threading through the needle). For these hearts, my thread length seemed too short to complete a full heart, even when I cut them at 48 inches (before threading), so maybe you might want to try with a longer length of thread. 

I watched this video to learn how to cross stitch a heart, but because we're stitching on magazine papers, you don't have to follow all the instructions. To start or end a thread just tie a knot at the back to secure it! Also take note, pulling too hard might tear the paper, so be gentle!

 photo P2110388_zps4d0a42ef.jpg
It'll take a bit practice but once you've got the hang of it, you'll be able to do it pretty quickly! You can also do this on thicker paper if you feel like magazine pages are too flimsy as envelopes. 

 photo P2110402_zpsd92d510a.jpg
And there you have it! A simple craft that you can use to dress up your love letters for Valentine's Day or any other day in the year. :)


Eunice


Wednesday, 22 January 2014

HAIRBANDS + PIPE CLEANERS = ?

 photo P1220112_zpsfaa7eb9f.jpg
Super Simple Photobooth Hairband Props!

Here's a DIY idea that not only requires just two simple items, its also easy to whip up last minute for any party or photobooth that could use some props! 

Pipe cleaners are the perfect material for this project, because they can be bent any way you want them to, giving you almost unlimited freedom in your creativity for this project. I chose the sparkly ones, but there are also furry ones you can use. Also, hairbands that are flat (wider width) are more suitable because the pipe cleaners will shift around less.

Here are some ideas!

 photo P1210081_zps0115f5dc.jpg  photo P1210094_zpsac726b80.jpg  photo P1210092_zps36a1d740.jpg
If you want to make shapes like those above, they are easy because they are made of simple lines, and do not require too many contact points with the hairband, only 1-2 per strand. This is good, because remember, each contact point should preferably be wrapped around the hairband so that the pipe cleaners are secure. They are pretty flimsy, and easily bent even after securing, so remember to be gentle with them. 

Off the top of my head, some other ideas that would work easily: Mickey ears, antlers, Yoda ears (more towards the side of the head), the Sims PlumbBob, any of the Teletubbies antennas.

 photo P1210076_zpse500b75c.jpg  photo P1210089_zps1b255e33.jpg
Here's something a little more trickier. I went into this project with the idea that I would make tons of words with these pipe cleaners, but man, it was not as easy as I expected. 

Words require a lot of contact points with the hairband (almost one for every letter), and also preferably, the letters should all be connected to make them sturdier. This makes it hard because we can't use one length of pipe cleaner as it is. It needs to be cut up (not all letters link easily to the next, like 'B' or 'D'), and usually requires more than one length because letters require a lot of bending. This is a problem because if you bend/twist the sparkly pipe cleaners too much, the shiny strands detach from the wires and fall all over your workspace. So if you can, plan (draw) it out in advance so you can hopefully get it right in one shot.

Not just letters, numbers would be a good idea too! Maybe I should make some with 2015 across for the next new year. Or, 21, since everyone my age is turning 21 this year. Ideally I would go for larger words, but I did not have enough pipe cleaners on hand. You should take into consideration the size of what you want to have when you go out to buy pipe cleaners! From my experience, you always think you need less than you actually do. Haha

 photo P1210095_zpscd5eb3aa.jpg

So there you have it! Super simple right? Oh one more important note: make sure none of the ends are on the bottom side of the hairband. You wouldn't want to scratch or cut your scalp when you put on one of these! Make sure all sharp ends are winded/tucked away tightly above the hairband!

Eunice


Wednesday, 15 January 2014

DIY CAKE BUNTING 3 WAYS

 photo P1108431title_zpsfda0944b.jpg
Today I'm going to share with you some simple DIY ideas for cake bunting. It's a super easy way to add colour and a personal touch to a simple cake, and ther is so many variations you can use to make these. Here, I'll touch on 3 different ideas for cake bunting, namely, using paper, ribbon and washi tape.

Let's start with paper, because its the item that most of us are sure to have on hand without having to go to a store. 

 photo P1108388_zps8da38846.jpg
For paper bunting, you need coloured paper (I used A5 size), scissors, twine (or string), and most importantly, wooden skewers. I have watercolours and brushes because I wanted to go for a unique speckled look instead of a plain colour.

 photo P1108396_zps04a5c0ef.jpg  photo P1108393_zps601ec5b9.jpg
I found the easiest way to achieve this look was to brush my thumb upwards along the flat tip of my brush (flat brushes work better than round brushes), and also to use less water when diluting the paint, because if you are using regular coloured paper, the wet paint won't stand out as the paper absorbs the water. 

 photo P1108417_zpsf309d06b.jpg
This step is used for all the buntings. I cut a 9 inch length of twine so that I can be sure to have at least 6 inches of twine in the centre after tying it to the skewers. I use a basic knot, as shown above, and do that twice on each side to secure it. If you don't want to risk the rope loop moving around you can even secure it with a dot of glue. You can always attach the flags first before tying, but I feel like tying first gives me a better sense of how I should attach the flags.

 photo P1108401_zps3e916510.jpg
What I did was to fold the paper in half before cutting, because with the handmade speckles, there is a tendency for the centre of the paper to be more speckled than the sides. While it is folded, cut out about 1.5cm wide strips. 

After that, place the twine in between the folded sides, and staple it down (you can opt for glue of tape if you don't like the look of stapler bullets). You want to make sure that you don't staple too far down such that its loose and can move around a lot on the string, but also not too far up such that you staple onto the string or your paper flags cannot be wiggled around later. 

You probably don't need as many flags as you cut, so pick those that are nicely speckled! Once you've attached the number of flags you want, you can start to cut triangles out from the end to get the swallowtail shape. You can cut your buntings at any length you like, but also depends on the length of your skewer, because you don't want your bunting to be touching the cake when you're done. 

Finally, move them around so that they are evenly spaced out and in the centre of the bunting, and you're done!

 photo P1108380_zpsb916b502.jpg
The second bunting is made from washi tape. I don't have step by step instructions because its pretty straightforward, and also, I made this one years ago. So, no pictures.

This time, do not tie the twine to the skewers first, I'll explain why in a bit. 

Cut a 4-5cm length of tape for each flag, position and fold the tape over the length of twine and stick it down so you get a rectangle. After which, grab a pair of scissors and cut triangles like we did for the paper bunting. And if you'd like, use a permanent marker to add some letters like I did. 

Once you're done with all that, tie the ends of the twine to the skewers such that the flags are in the center, and its okay if one side has more excess twine than the other, you can just snip it off.

 photo P1108385_zps8b0ca6bc.jpg
The tricky thing about using washi tape is: the tape will stick to the twine. This means you will not be able to shift it around like the paper flags. So you have to get the positions and spacing right on the first try, but being in the centre of the twine is not as much of a priority since you can adjust that later when you tie the twine to the skewers. 

Also, the washi tape flags have a tendency of sticking out at different angles if they are not pasted onto the twine flat, and can be a cause of much irritation, so thats another factor to watch out for!

Sidenote: I recommend doing just one layer instead of three like I did here because it can get quite tricky and frustrating, but if you're up for the challenge go ahead!

 photo P1108359_zpsa73d59c0.jpg
For the last one, we'll do a ribbon knot bunting. Pretty straightforward too!
Tie the twine to the skewer like we did for the paper bunting. Cut 4-5 inches of ribbon or whatever length you like (I think a bunting of different length ribbons looks better) but remember that you at the end the ribbon flag will be a bit less than half that length. Because here's how I tied it:

 photo P1108366_zps4c41b0d2.jpg
The process of tying the ribbons to the twine is pretty clear from the photos right? After that, cut the edges, and I like to add a little clear nail polish to the cut edges of ribbon just so the threads do not start unravelling and make a mess.

The ribbons can be shifted around so go ahead and space them out. Also, remember that you don't have to fill out the whole length with bunting flags, sometimes less and simpler and simpler is better.

Just a tip, I find the tying easier to do with thinner and well, softer ribbons. Thicker and stiffer ribbons just seem to come loose easily, and the large knots they make aren't very pretty. If you didn't notice (hopefully), my striped ribbons are actually half the width of the actual ribbon. I cut them down the centre to make two ribbons because they were too thick. And because their material is still stiff and 'uncooperative', you can see (below) that the knot they create is larger than the wider but softer plain blue ribbons. So thats one thing to consider when picking your ribbons. You can tie knots with them to test how 'cooperative' they would be.

 photo P1108431_zps244dfa27.jpg
And thats it! We've gone through 3 simple ideas for cake bunting you can tweak and make your own. Play with the colours and the look, for example, using triangle or pointed flags instead of the swallowtail shape I used here. You can even try creating that knot look with perhaps strands of thread, or tiny strands of crepe paper. There are so many ways to jazz these up, my head is still swirling with ideas.

I hope you got some ideas for your own cake bunting from the post! I had fun with this one!

Eunice


Friday, 3 January 2014

TRADE SCHOOL BOOKBINDING CLASS

 photo tradeschool-classbnw_zps71040b5d.jpg


In December, I attended a bookbinding class taught by Ian from The Thistle Bindery and organized by Trade School Singapore. Bookbinding has always been interesting to me, and I have made quite a few notebooks myself too, but I got to pick up some new tips and tricks from Ian. But before I go into that, I just wanted to talk about Trade School Singapore for a bit.

From their tumblr, "Trade school singapore is an alternative learning space that runs on barter. Modelled after trade school new york, teachers share their knowledge and skills without taking a fee. Instead, students respect the teacher’s time and effort by fulfilling one item on the teacher’s wish list. This creates a collaborative space where students and teachers barter based on a coincidence of wants." 

Basically, this means classes are free, but when students sign up, they are required to pick something on the teacher's wish list, whether it is to donate to charity, bring something from home, or agreeing to do something for the teacher. Its a fantastic idea, because classes can get really expensive these days, and this provides the opportunity for people to come together as a community and learn from each other. 

Because classes are proposed voluntarily by individual teachers, you can guess that Trade School has held quite a diverse range of interesting classes, with topics including floral arrangement, coffee tasting, conversational cantonese, calligraphy (a class I really wanted to attend boohoo), beatboxing, and these are just during Season 2! During Season 1 in 2012, they had self defense, friendship bands, an introduction to typography, and much more! Sounds pretty exciting doesn't it? It sure is!

 photo P1038335_zpsf409d0ca.jpg
For Ian's bookbinding class, he told us more about the different types of book binding techniques, the tools that were best for the job, types of materials that were best for bookbinding, and we were taught the pamphlet binding technique, which is kind of the same style I have been binding my small notebooks with.

 photo P1038341_zps2d389439.jpg  photo P1038340_zps7b0c9949.jpg
One thing different was that he taught us the method of making a cover that allowed us to hide the binding instead of having the thread visible along the spine. That was something new to me.

 photo P1038336_zps406b22b4.jpg
He also taught us how to make a cover closing that allowed the notebook to held shut. I have never made such a closing for my notebooks before and always end up worrying that the paper or corners of the cover will get squashed in my bag. Here's a possible solution for that problem!

 photo P1038338_zps8ed0c4e2.jpg And because it was the festive holiday season, Ian got us to add christmas trees to the centre of our notebooks. Its a cute little touch.

The class was great, Ian was really helpful and funny and everyone there was friendly. I felt quite out of place for a bit because everyone there had professions and I was the only one still in school but once we got busy with the bookbinding it was pretty fun.

Now that I've been to one class, I'm looking forward to the next season sometime this year, and I'll be sure to remember to keep checking back, because class slots run out really fast on the Trade School site! Maybe next season we can take up some interesting classes together, how about it? :)

Eunice


Tuesday, 24 December 2013

DIY CHRISTMAS CAROLS WRAPPING PAPER

 photo PC248220title_zps4d0d5ab5.jpg
Christmas Eve is here! Before I go off for a family Christmas gathering, I thought I'd drop bye with a quick DIY for those of you who have left present wrapping to the very last day (like me). I like to wrap all my presents in a similar style and this year I wanted to do something simple but fun and I decided to go with handwritten christmas carols in Christmas colours.

 photo PC248222_zpsebdc81a6.jpg

Just grab brown parcel paper, a few markers (I used Zebra Mildliners), the lyrics of a few of your favourite songs, tape and you're pretty much all set. To make things easier I estimated the amount of parcel paper I would need for each present before I started writing because I wanted them each to feature different carols.

 photo PC248221_zps477b3601.jpg

I though what could be more Christmasy than picking from the carols we sing in church during Christmas services? So here I wrote out 'Go tell it on the mountain', 'Come on ring those bells', 'Joy to the World', 'Mary's little boy child', and I'm going to write one more of my favourites 'See Him lying on a bed of straw'. I sure had fun singing all these Christmas carols while I was writing them out!

 photo PC248232_zpsfb154504.jpg

For name tagging the gifts, I stuck sticker letters on them but you could also write them out in the middle of the lyrics like how I did for Joash. 

What about you? How are you wrapping your gifts this Christmas? :)
Eunice


Wednesday, 4 December 2013

TRANSFORMERS POP-UPS


 photo transformerspopup2_zpsa458f637.jpg

So three weeks ago I dedicated a post to pop-up books that I wish I had. While doing up that post, I came across something pretty awesome: the DIY Pop-Up section on the websites of the paper engineers of those incredible books. 

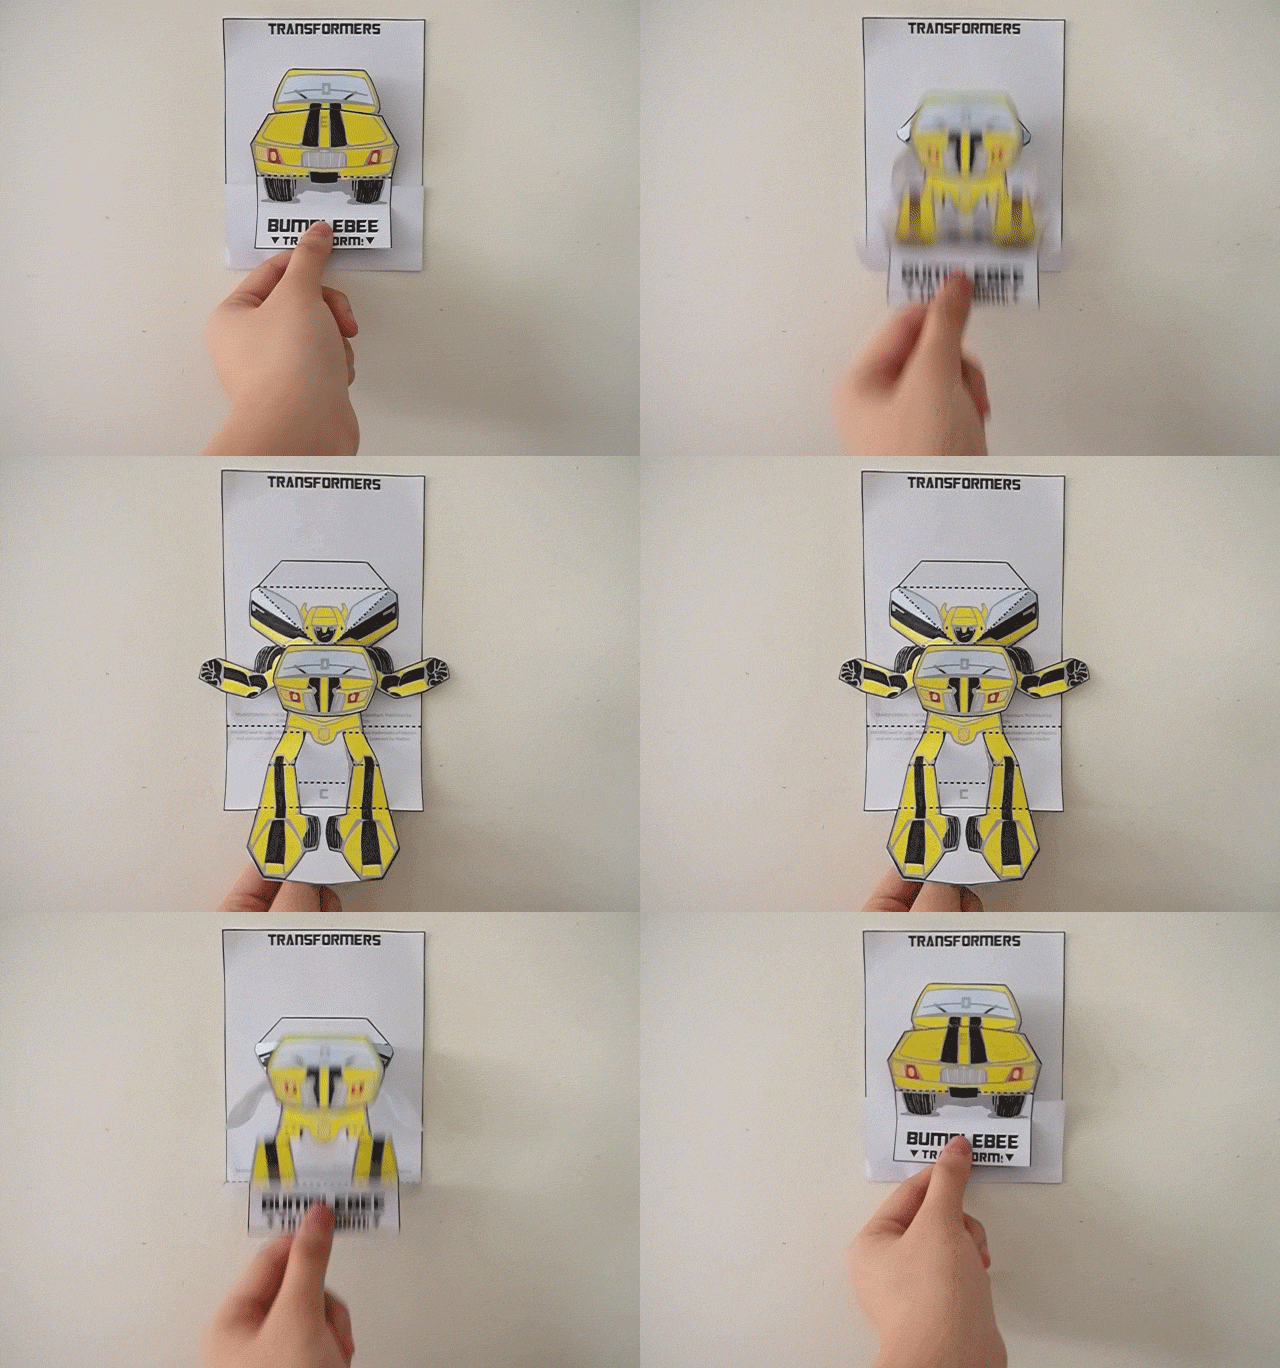
I decided I had to try them for myself, because I thought making them on my own would give me some clue as to how pop-ups worked. And I can safely say I don't think it enlightened me much. Haha But it was still fun. I love my transformers. I even made GIFs to show you! (First try at making GIFs too) Haha

 photo bumblebeepopup_zps23974fa1.gif
 photo optimuspopup_zps1940830e.gif

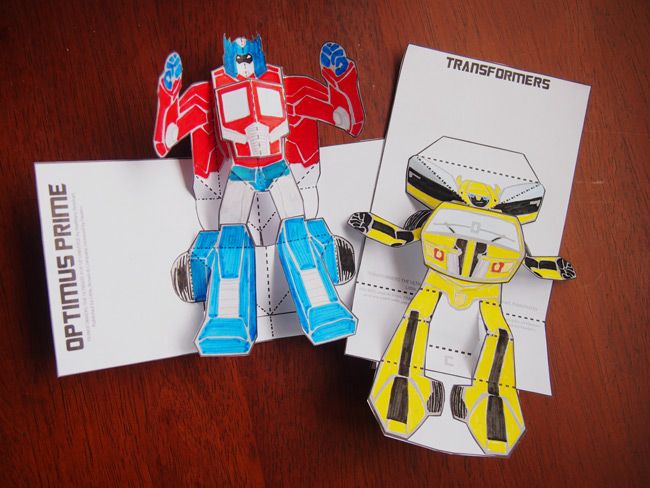
Are the GIFs giving you a headache, because they are starting to give me one. Haha I especially love how Bumblebee transforms from a car. These are the Transformers Pop-ups from, one of my favourite paper engineers, Matthew Reinhart's DIY section. He has uploaded tons of neat DIY Pop-ups there, including Star Wars characters like Chewbacca and Darth Vader. These would make fun art projects to do with children, because they are all part colouring pages. If I had nephews instead of nieces, I would have let them make these with me. But I guess my niece might like pop-up bears and stuff too.

Robert Sabuda also has his own DIY section, where the pop-ups are more generic stuff like animals and flowers. Which I guess would make for good templates if you want to make a pop-up card!

 photo transformerspopup_zps7c4aebae.jpg


Pretty neat? They sure are. If you feel like you're too old to make them without "helping" a kid make one, heres the assurance you needed to hear: You are never too old for pop-ups. Now go get some markers, scissors, and glue and get crafting!

Just thought I should add: I used regular paper to make these because that is all I had at home, but if you have slightly thicker paper, that would certainly make for sturdier pop-ups!

Eunice