
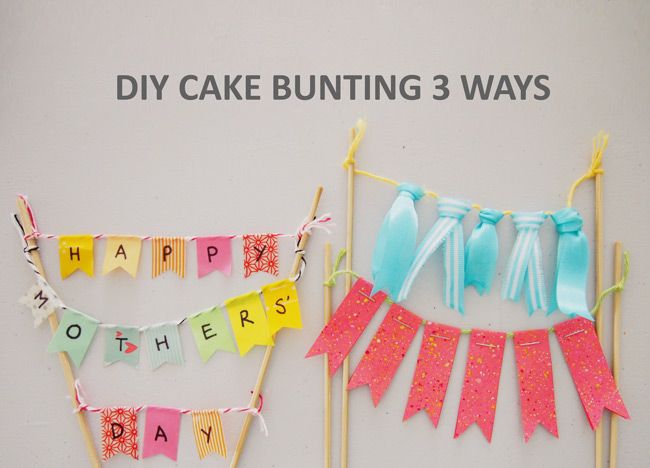
Today I'm going to share with you some simple DIY ideas for cake bunting. It's a super easy way to add colour and a personal touch to a simple cake, and ther is so many variations you can use to make these. Here, I'll touch on 3 different ideas for cake bunting, namely, using paper, ribbon and washi tape.
Let's start with paper, because its the item that most of us are sure to have on hand without having to go to a store.

For paper bunting, you need coloured paper (I used A5 size), scissors, twine (or string), and most importantly, wooden skewers. I have watercolours and brushes because I wanted to go for a unique speckled look instead of a plain colour.
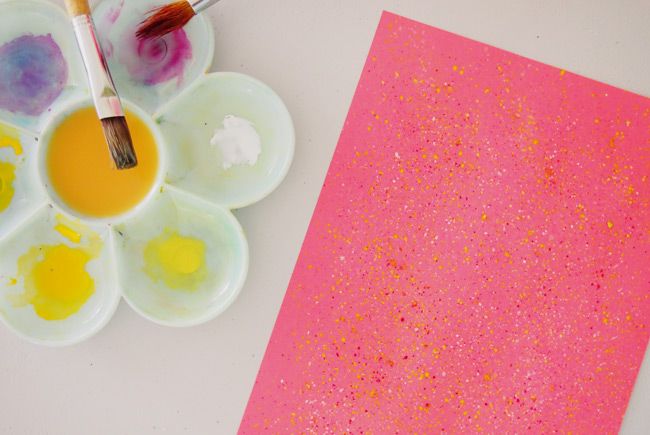

I found the easiest way to achieve this look was to brush my thumb upwards along the flat tip of my brush (flat brushes work better than round brushes), and also to use less water when diluting the paint, because if you are using regular coloured paper, the wet paint won't stand out as the paper absorbs the water.
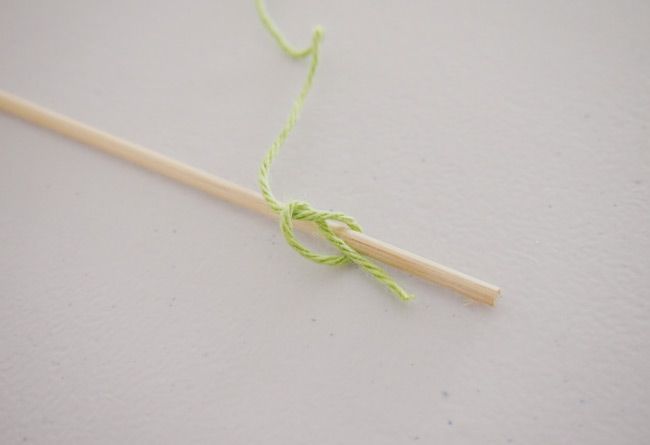
This step is used for all the buntings. I cut a 9 inch length of twine so that I can be sure to have at least 6 inches of twine in the centre after tying it to the skewers. I use a basic knot, as shown above, and do that twice on each side to secure it. If you don't want to risk the rope loop moving around you can even secure it with a dot of glue. You can always attach the flags first before tying, but I feel like tying first gives me a better sense of how I should attach the flags.
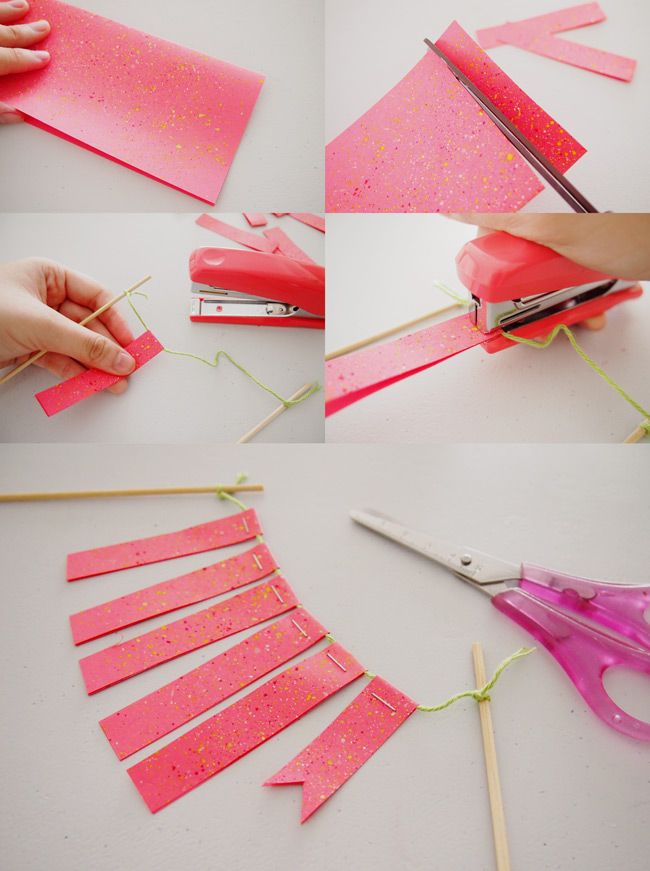
What I did was to fold the paper in half before cutting, because with the handmade speckles, there is a tendency for the centre of the paper to be more speckled than the sides. While it is folded, cut out about 1.5cm wide strips.
After that, place the twine in between the folded sides, and staple it down (you can opt for glue of tape if you don't like the look of stapler bullets). You want to make sure that you don't staple too far down such that its loose and can move around a lot on the string, but also not too far up such that you staple onto the string or your paper flags cannot be wiggled around later.
You probably don't need as many flags as you cut, so pick those that are nicely speckled! Once you've attached the number of flags you want, you can start to cut triangles out from the end to get the swallowtail shape. You can cut your buntings at any length you like, but also depends on the length of your skewer, because you don't want your bunting to be touching the cake when you're done.
Finally, move them around so that they are evenly spaced out and in the centre of the bunting, and you're done!
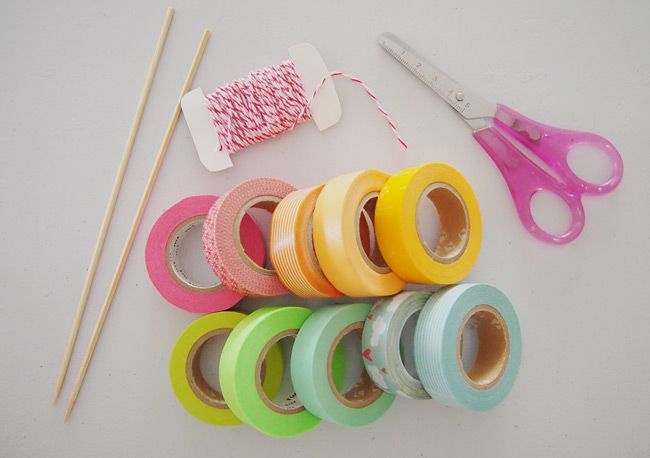
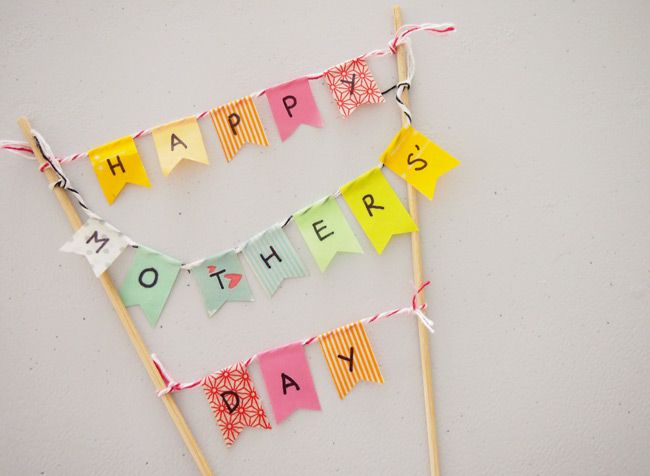
The second bunting is made from washi tape. I don't have step by step instructions because its pretty straightforward, and also, I made this one years ago. So, no pictures.
This time, do not tie the twine to the skewers first, I'll explain why in a bit.
Cut a 4-5cm length of tape for each flag, position and fold the tape over the length of twine and stick it down so you get a rectangle. After which, grab a pair of scissors and cut triangles like we did for the paper bunting. And if you'd like, use a permanent marker to add some letters like I did.
Once you're done with all that, tie the ends of the twine to the skewers such that the flags are in the center, and its okay if one side has more excess twine than the other, you can just snip it off.
The tricky thing about using washi tape is: the tape will stick to the twine. This means you will not be able to shift it around like the paper flags. So you have to get the positions and spacing right on the first try, but being in the centre of the twine is not as much of a priority since you can adjust that later when you tie the twine to the skewers.
Also, the washi tape flags have a tendency of sticking out at different angles if they are not pasted onto the twine flat, and can be a cause of much irritation, so thats another factor to watch out for!
Sidenote: I recommend doing just one layer instead of three like I did here because it can get quite tricky and frustrating, but if you're up for the challenge go ahead!
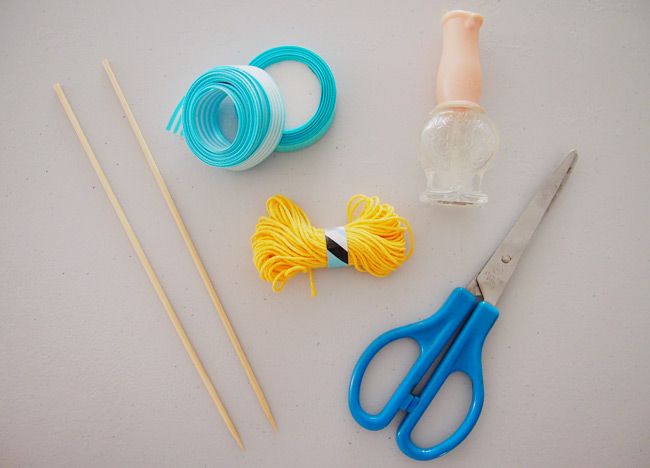
For the last one, we'll do a ribbon knot bunting. Pretty straightforward too!
Tie the twine to the skewer like we did for the paper bunting. Cut 4-5 inches of ribbon or whatever length you like (I think a bunting of different length ribbons looks better) but remember that you at the end the ribbon flag will be a bit less than half that length. Because here's how I tied it:

The process of tying the ribbons to the twine is pretty clear from the photos right? After that, cut the edges, and I like to add a little clear nail polish to the cut edges of ribbon just so the threads do not start unravelling and make a mess.
The ribbons can be shifted around so go ahead and space them out. Also, remember that you don't have to fill out the whole length with bunting flags, sometimes less and simpler and simpler is better.
Just a tip, I find the tying easier to do with thinner and well, softer ribbons. Thicker and stiffer ribbons just seem to come loose easily, and the large knots they make aren't very pretty. If you didn't notice (hopefully), my striped ribbons are actually half the width of the actual ribbon. I cut them down the centre to make two ribbons because they were too thick. And because their material is still stiff and 'uncooperative', you can see (below) that the knot they create is larger than the wider but softer plain blue ribbons. So thats one thing to consider when picking your ribbons. You can tie knots with them to test how 'cooperative' they would be.

And thats it! We've gone through 3 simple ideas for cake bunting you can tweak and make your own. Play with the colours and the look, for example, using triangle or pointed flags instead of the swallowtail shape I used here. You can even try creating that knot look with perhaps strands of thread, or tiny strands of crepe paper. There are so many ways to jazz these up, my head is still swirling with ideas.
I hope you got some ideas for your own cake bunting from the post! I had fun with this one!
Eunice

So beautiful! Thank you for the tutorial! I've feature this on my blog with the link back to your site. Hope that's okay!
ReplyDeleteMel x
www.melanie-eman.com
Hi Mel, that's totally okay! Thank you for your kind words, and thank you for linking back! And by the way, your blog is really lovely. :)
DeleteEunice
The blog was absolutely fantastic! Lot of information is helpful in some or the other way. Keep updating the blog, looking forward for more content...Great job, keep it up. bunting T-stand services in Malaysia
ReplyDeleteGood blog and you have described in a very nice way. Thanks for providing such an informative blog. You can find more about Bunting Stand in our website.
ReplyDeleteGood blog and you have described in a very nice way. Thanks for providing such an informative blog. You can find more about bunting T-standin our website.
ReplyDelete